

1.0 Introduction
Guru Agent Editor is an application used to create configuration files for Guru Agents. Guru Agents are used to perform various types of automated functions related to copying and assembling of files. This document describes how to configure a Guru Agent.
Guru Agent is used to perform automatic copying of files. It can perform automated copy functions from one Guru to another, from a Guru to a file system, or from a Guru to designated FTP locations. It can do so at regularly programmed intervals, it can be manually executed, or be executed on Guru start up. It can be run manually by choosing Apps > Guru Agent and then selecting the correct one from the list.
A Guru Copy Agent can operate on multiple sources as well as multiple destinations. Each can specify the type and location of the source or destination as well as any additional parameters, such as proxies, to allow the connection to navigate firewalls etc.
2.0 File Copy Guru Agent
2.1 Overview
This section describes the editor used to configure agents that perform the file copy function.
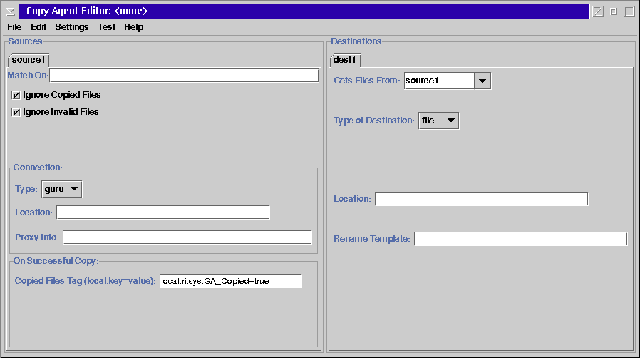
The above figure shows the Guru Agent Editor application. On the left half are the data sources in a set of tabbed panes, the right contains data destinations.
In addition, there are pull down menus, found at the top of the program, that allow for configuring a Guru Agent, loading and saving of settings as well as adding and removing of data sources and destinations.
2.2 Using The Guru Agent Editor
2.2.1 Opening a File For Editing
Loading a file for editing is accomplished by selecting the pull down menu: Guru > Open. This presents a list of available Agent setting files for editing. Select a file, and then select the “OK” button.
Similarly, selecting Guru > Save or Guru > SaveAs causes a configuration to be saved back to Guru. Save overwrites the previous file; SaveAs causes the creation of a new agent, thus preserving the old one. Note that in either case, previous versions are always retrievable using the Guru “Revision History” feature.
2.2.3 Settings
The Settings pull down menu has two options: Execution and Email. These are settings that control how the Guru Agent will run, when it will run as well as how often. (There is a minimum set time interval of 10 minutes.)
2.2.3.1 Execution Settings
The pull down menu Settings > Execution displays a dialog such as the one shown in Figure 1.
The Execution settings control what type of copying will occur, how often the agent will run as well as whether it runs automatically at the specified rate (auto type), only at Guru startup (startup type), or only when manually executed, such as from the Guru App selection button (Manual type).
Choosing An Appropriate Agent Execution Type:
- Regular Copy Agent is correct for most Guru Objects. This will create a file to match the object.
- STDF Copy should be chosen for ObjClass=RiDatalog and Format=STDF. This relys on the ri.sys.PartOf attribute to concatenate binary STDF pieces into a single file ordered by the ri.sys.SortOrder attribute. An error is reported when pieces are missing, this can happen due to a race condition where the piece has not yet arrived from the tester. If there was a tester fault, manual STDF recovery may be required.
- RITdb Copy should be chosen for most ObjClass=RITdb.datalog objects except Type=verify, which can use Regular Copy Agent. This relys on the ri.sys.PartOf attribute to combine RITdb (sqlite) "windows" into a single file ordered by the ri.sys.SortOrder attribute. (Requires Guru Agent v100+ and Guru Agent Editor v62+)
To Set the When to Run Interval:
- Choose Apps > Guru Agent Editor
- Choose Guru > Open and select an Agent from the list.
- Choose Settings > Execution (See Figure 1)
- Set When to Run to Auto (regular intervals).
- Use the pull down menu values for Days Hrs Mins Secs. Set a value at or above 10 minutes, any value below that will be ignored and a 10 minute interval will be used. Guru Agents sets a trigger timestamp based when the agent finishes by adding this value to the current time. The Guru Agent application that launches automatically with Guru Server app will trigger to run once that time has passed. When processing STDF datalogs, this means the .stdf file will start to be generated up to 10 minutes after the Stop action is pressed and end of lot process saves the Summary object to guru, that matches the Match On value in the source1 tab.
- Choose Guru > Save, and close Guru Agent Editor App.
- (Optional) If logging is enabled (see below), to view the Agent Logs, use Guru Browser app to view ri.sys.ObjClass = RiErrorLog and ri.sys.Name = CopyAgentLog. Then View Options > Attributes and Objects to view the log contents in the preview pane. Exported .GOB files can be viewed in any text editor by using Guru browser to export .gzp, rename the file extension to .zip, open the archive, then open any .GOB file with a text viewer like Notepad.
To Enable Logging:
- Choose Apps > Guru Agent Editor
- Choose Guru > Open and select an Agent from the list.
- Choose Settings > Execution (See Figure 1)
- Change Logging Level to 2 or 3
- Choose Guru > Save
- Use Guru Browser to view ri.sys.ObjClass = RiErrorLog and ri.sys.Name = CopyAgentLog. Then View Options > Attributes and Objects to view the log contents in the preview pane. Exported .GOB files can be viewed in any text editor by using Guru browser to export .gzp, rename the file extension to .zip, open the archive, then open any .GOB file with a text viewer like Notepad.
Figure 1: Execution
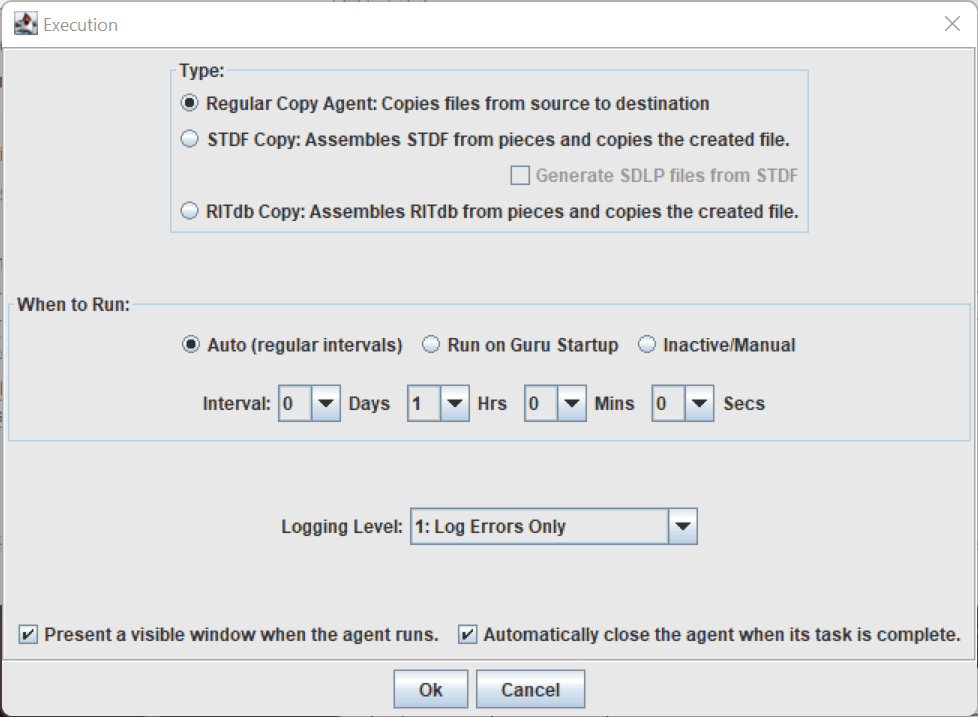
In addition, the message logging level can be selected. Normally only errors are logged, but additional information about the operation of an agent will be logged if a higher level is selected.
The message logging levels are:
0: No logging of any sort
1: Log errors only. For example: "Couldn’t find destination directory"
2: Log normal activity + errors. This includes lists of files that were successfully copied, and so on.
3: Log everything (debug). This enables logging of internal program events that are normally not of interest to most users.
Note: The selections “Regular Copy Agent” versus “STDF Copy Agent” refer to the manner in which source files are selected for copying. The primary difference is that an “STDF Copy Agent” collates and assembles a file comprising disparate sections, prior to copying the file. For non-STDF type files or cases where the STDF file is complete, like with ACSdataSave, the “Regular Copy Agent” selection should be used. RITdb Copy agent is used with specific RITdb.datalog objects to assemble "windows" into a single RITdb file.
2.3 Source Settings
The left area of the main application window represents the ‘Sources’ information. Each source of data is defined in a separate tab.
A Source defines:
1. What needs to be copied.
2. Where it can be found.
3. How it can be fetched.
There can be one source or many sources. To add more sources, click on the Edit > Add Source pull-down menu; this causes a new data source tab to be opened.
By default these are named 'source1', 'source2', etc. Right click on the source tab to rename a source, giving it a more descriptive name.
A Source can be deleted by first selecting it (so that it is displayed), and then selecting Edit > Delete Source.
The Match On field represents the matching criteria, i.e. what is to be fetched. Normally the matching criteria consists of Guru keys and values that are used to fetch relevant data. What is entered here is a comma separated list of keys, or key=value pairs, that uniquely identify the data that is to be fetched. For example: ‘ri.sys.ObjClass=RiAdminLog, ri.hw.Tester=Cassini’. This would cause any file, in the source location, that had that particular set of key/values, to be included in the group of files to be copied off.
Note: When using the agent to assemble STDF or ATDF data logs, the Match On selection string should include "ri.sys.ObjClass=RiDatalog, ri.sys.Type=summary"
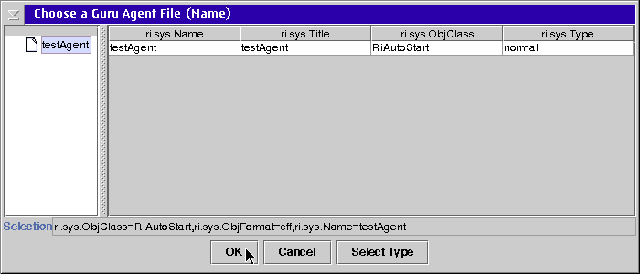
The Type selection: currently only Guru Sources are allowed, therefore the selection box only allows for source selection of type ‘guru’.
The Location field specifies where the source is located. Legal entries here are either the word ‘local’ which implies that the ‘Local Guru’ is to be the source for the data. Or else any IP address or URL can be specified. An example would be ‘lab.roos.guru’. In addition to the IP address or URL, a colon and port number is optional, for situations where a non-standard Guru port is being accessed. For example: 10.11.1.123:50000.
Proxy Info allows for a proxy to be used as a means of accessing the Source location. A proxy can be either in the form of an HTTP proxy, a socks 4 or socks 5 proxy. Clicking on the Proxy Info field will bring up a dialog that allows selection of the type of proxy as well as the relevant required information e.g. hostname, proxy port address, proxy username and password (if needed).
Copied Files Tag: This field defines a key that will be set after the copy operation is successfully completed. This is used in conjunction with the check box: “Ignore Copied Files”, to keep from re-copying files that have already been copied. Always start the key with "local." to prevent the object from being copied just to add this attribute. All keys that start with "local." are only avaialble to the local Guru and will not duplicate the file to make changes and add to the revision history of the object.
Ignore Already Copied Files: This check box works in conjunction with the “Copied Files” entry. The default state is for this to be selected. If selected then any files that have already been copied, won’t be copied again. De-selecting this will cause files to be copied; even if they have already been previously copied.
2.4 Destination Settings
The area on the right hand side of the main application window represents one or more ‘Destinations’, where the data is to be copied. This defines the type of destination, the location information, as well as the file naming criteria.
Note that there can be one destination or many destinations. Each is shown as a separate tab. In order to add more destinations, click on the Edit > Add Destination pull-down menu; this causes a new Data Destination to appear, as a tab, in the right hand area of the application.
As many destination as desired can be added. A destination can be deleted first selecting it (so that it is displayed) and then selecting Edit > Delete Destination.
The Type field can be any of three possible values: ‘guru’, ‘ftp’, or ‘file’. This identifies the type of destination being defined.
The remaining fields will display if needed for the different destination type as described below.
The Location field describes either the IP address, ftp location or file system location to connect to when copying files to this destination. Valid entries here would be an IP address or URL followed by an optional port number, or else a valid file pathname.
The Rename Template is used to automatically create a file name from guru keys. This is important when the destination is either ftp or file.
Guru destinations do not need a file name because, within guru, files are specified by their attributes. When copying a file from Guru, the Rename Template describes how to use the Guru file attributes to construct a file name when copying to the target destination.
Any text entered into the rename Rename Template becomes a part of the file name. For example, entering "My Special Filename.abc" will cause all files copied by the agent to be called "My Special Filename.abc. Resulting in only one file, the last file copied, since they all came over with the same name. The naming of the file can be 'enhanced' by including Guru attributes in the Rename Template.
By enclosing Guru keys in angle brackets, any Guru keys can be specified in the file naming.
As of GuruAgent v91 (2018-04) GuruAgent has now been updated to allow the following characters which were previously disallowed: + = ; , @
In addition, these characters are now disallowed: % & { }
The complete list of characters that are switched to dashes (-) is: | : { } < > / \ * ? # % & ` " \
Spaces still convert to underscore (_).
For example, a Rename Template entry of:
some-text<ri.dlog.Device>-more-text-<ri.dlog.Lot>-<ri.dlog.Sublot>.stdf
Would result in a filename of: some-text-DEVICE_NAME-more-text-LOT-SUBLOT.stdf
Here is a list of some common Guru attributes, a complete list is presented when the Insert| Guru Keyoption is selected in the Rename Template User Entry Dialog.
| ri.dlog.Device ri.dlog.Lot ri.dlog.SubLot ri.dlog.EndTime ri.dlog.OperatorName ri.dlog.SetupId ri.dlog.StartTime ri.dlog.Tester ri.dlog.TestExec ri.dlog.Wafer | ri.hw.Esn ri.hw.FixtureNumber ri.hw.systemSn ri.sys.Cid ri.sys.CreationDate ri.sys.ExpireOn ri.sys.ObjFormat ri.sys.Owner ri.sys.Title ri.sys.Name | ri.sys.User ri.test.Device ri.test.DeviceId ri.test.Dib ri.test.ExecBarcode ri.test.Family ri.test.Fixture ri.test.FixtureClass ri.test.Site ri.test.Testplan |
In addition, there are formatting options, specified by the hash '#'. For example:
#Date<ri.sys.CreationDate>: Formatted date: when the data file was created
#Time<ri.sys.CreationDate>: Formatted time: when the data file was created
#DateNow<>: Formatted DateTime: when the copy operation happened.
#IndexVal: Sequential index value. This can be used to ensure unique file names.
#Ditto: Holds the last file name used. This can be useful in conjunction with multiple destinations for the same file, when the same name is desired for each. Especially useful with #DateNow or #IndexVal to preclude the file having a different name at each target location.
Note that the Rename Template User Entry Dialoghas special keys for auto-inserting these values.